| Spring websocket+Stomp+SockJS 实时通信源码详解 | 您所在的位置:网站首页 › springboot websocket详解 › Spring websocket+Stomp+SockJS 实时通信源码详解 |
Spring websocket+Stomp+SockJS 实时通信源码详解
|
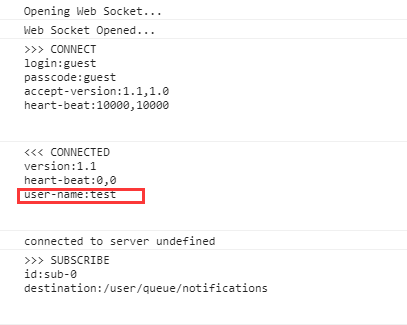
一、三者之间的关系 Http连接为一次请求(request)一次响应(response),必须为同步调用方式。WebSocket 协议提供了通过一个套接字实现全双工通信的功能。一次连接以后,会建立tcp连接,后续客户端与服务器交互为全双工方式的交互方式,客户端可以发送消息到服务端,服务端也可将消息发送给客户端。 SockJS 是 WebSocket 技术的一种模拟。为了应对许多浏览器不支持WebSocket协议的问题,设计了备选SockJs。开启并使用SockJS后,它会优先选用Websocket协议作为传输协议,如果浏览器不支持Websocket协议,则会在其他方案中,选择一个较好的协议进行通讯。 -服务端使用: registry.addEndpoint("/endpointChat").withSockJS();-客户端使用: //加载sockjs var url = '/chat';var sock = new SockJS(url);//SockJS 所处理的 URL是“http://“或“https://“,而不是“ws://“or “wss://“//.....STOMP 中文为: 面向消息的简单文本协议。websocket定义了两种传输信息类型: 文本信息和二进制信息。类型虽然被确定,但是他们的传输体是没有规定的。所以,需要用一种简单的文本传输类型来规定传输内容,它可以作为通讯中的文本传输协议,即交互中的高级协议来定义交互信息。 STOMP本身可以支持流类型的网络传输协议: websocket协议和tcp协议。 Stomp还提供了一个stomp.js,用于浏览器客户端使用STOMP消息协议传输的js库。 STOMP的优点如下: (1)不需要自建一套自定义的消息格式 (2)现有stomp.js客户端(浏览器中使用)可以直接使用 (3)能路由信息到指定消息地点 (4)可以直接使用成熟的STOMP代理进行广播 如:RabbitMQ, ActiveMQ 二、配置WebsocketStompConfig 1、共享sessionimport org.springframework.context.annotation.Configuration;import org.springframework.messaging.simp.config.MessageBrokerRegistry;import org.springframework.web.socket.config.annotation.AbstractWebSocketMessageBrokerConfigurer;import org.springframework.web.socket.config.annotation.EnableWebSocketMessageBroker;import org.springframework.web.socket.config.annotation.StompEndpointRegistry;/** * @EnableWebSocketMessageBroker 注解表明: 这个配置类不仅配置了 WebSocket,还配置了基于代理的 STOMP消息; */@Configuration@EnableWebSocketMessageBrokerpublic class WebSocketConfig extends AbstractWebSocketMessageBrokerConfigurer { /** * 复写了 registerStompEndpoints() 方法:添加一个服务端点,来接收客户端的连接。将 "/endpointChat" 路径注册为 STOMP 端点。 * 这个路径与发送和接收消息的目的路径有所不同, 这是一个端点,客户端在订阅或发布消息到目的地址前,要连接该端点, * 即用户发送请求 :url="/127.0.0.1:8080/endpointChat" 与 STOMP server 进行连接,之后再转发到订阅url; */ @Override public void registerStompEndpoints(StompEndpointRegistry registry) { //添加一个/endpointChat端点,客户端就可以通过这个端点来进行连接;withSockJS作用是添加SockJS支持 registry.addEndpoint("/endpointChat").withSockJS(); } /** * 复写了 configureMessageBroker() 方法: * 配置了一个 简单的消息代理,通俗一点讲就是设置消息连接请求的各种规范信息。 * 发送应用程序的消息将会带有 “/app” 前缀。 */ @Override public void configureMessageBroker(MessageBrokerRegistry registry) { //定义了一个(或多个)客户端订阅地址的前缀信息,也就是客户端接收服务端发送消息的前缀信息 registry.enableSimpleBroker("/queue", "/topic"); //定义了服务端接收地址的前缀,也即客户端给服务端发消息的地址前缀 //registry.setApplicationDestinationPrefixes("/app"); // 点对点使用的订阅前缀(客户端订阅路径上会体现出来),不设置的话,默认也是/user/ //registry.setUserDestinationPrefix("/user/"); }}注意: 此配置是基于SpringBoot+Shiro的框架,Shiro维护了所有的session,在用户登录的时候就通过 SimpleAuthenticationInfo info = new SimpleAuthenticationInfo(user, password, getName());将用户信息注册成为principal。当客户端连接endpointChat成功时,stomp会取java.security.Principal的默认实现类(在我的系统中为shiro的principal)信息注册成为username,然后返回给客户端。这个username对于点对点发送消息十分重要,通过服务端和客户端维护相同的username来达到精准推送消息的目的。 2、自定义匹配规则 如果采用其他架构,没有实现principal,这就需要自己实现自定义的username规则,必须要通过实现自己的principal类来完成,参考代码如下: @Configuration@EnableWebSocketMessageBrokerpublic class WebSocketConfig extends AbstractWebSocketMessageBrokerConfigurer { @Override public void registerStompEndpoints(StompEndpointRegistry registry) { registry.addEndpoint("/endpointChat").setHandshakeHandler(new DefaultHandshakeHandler(){ @Override protected Principal determineUser(ServerHttpRequest request, WebSocketHandler wsHandler, Map attributes) { //key就是服务器和客户端保持一致的标记,一般可以用账户名称,或者是用户ID。 return new MyPrincipal("test"); } }) .withSockJS(); } @Override public void configureMessageBroker(MessageBrokerRegistry registry) { //定义了一个(或多个)客户端订阅地址的前缀信息,也就是客户端接收服务端发送消息的前缀信息 registry.enableSimpleBroker("/queue", "/topic"); //定义了服务端接收地址的前缀,也即客户端给服务端发消息的地址前缀 //registry.setApplicationDestinationPrefixes("/app"); // 点对点使用的订阅前缀(客户端订阅路径上会体现出来),不设置的话,默认也是/user/ //registry.setUserDestinationPrefix("/user/"); } /** * 自定义的Principal */ class MyPrincipal implements Principal{ private String key; public MyPrincipal(String key) { this.key = key; } @Override public String getName() { return key; } }}然后服务端给客户端发送消息:SimpMessagingTemplate.convertAndSendToUser(“test”,"/queue/notifications", "新消息");客户端订阅服务器发送的消息(控制板打印消息如图1):stomp.subscribe("/user/queue/notifications", handleFunction);注意:此处为什么不是“/user/test/queue/notifications”,稍候再讲。
一般在连接服务器时,需要验证此连接的安全性,验证用户是否登录,如果没有登录,不能连接服务器,订阅消息 /** * 连接时验证用户是否登录* @author LEITAO* @date 2018年4月18日 上午10:10:37 */public class SessionAuthHandshakeInterceptor implements HandshakeInterceptor{ private final Logger logger = LoggerFactory.getLogger(this.getClass()); @Override public boolean beforeHandshake(ServerHttpRequest request, ServerHttpResponse response, WebSocketHandler wsHandler, Map attributes) throws Exception { UserDO user = ShiroUtils.getUser(); if (user == null) { logger.error("websocket权限拒绝:用户未登录"); return false; } //attributes.put("user", user); return true; } @Override public void afterHandshake(ServerHttpRequest request, ServerHttpResponse response, WebSocketHandler wsHandler, Exception exception) { }}@Configuration@EnableWebSocketMessageBrokerpublic class WebSocketConfig extends AbstractWebSocketMessageBrokerConfigurer { @Override public void registerStompEndpoints(StompEndpointRegistry registry) { //添加一个/endpointChat端点,客户端就可以通过这个端点来进行连接;withSockJS作用是添加SockJS支持 registry.addEndpoint("/endpointChat")//添加连接登录验证 .addInterceptors(new SessionAuthHandshakeInterceptor()) .withSockJS(); } @Override public void configureMessageBroker(MessageBrokerRegistry registry) { //定义了一个(或多个)客户端订阅地址的前缀信息,也就是客户端接收服务端发送消息的前缀信息 registry.enableSimpleBroker("/queue", "/topic"); //定义了服务端接收地址的前缀,也即客户端给服务端发消息的地址前缀 //registry.setApplicationDestinationPrefixes("/app"); // 点对点使用的订阅前缀(客户端订阅路径上会体现出来),不设置的话,默认也是/user/ //registry.setUserDestinationPrefix("/user/"); } }三、@MessageMapping、@SendTo、@SendToUser注解 @MessageMapping注解和@RequestMapping注解功能类似,只不过@RequestMapping表明此方法是Stomp客户端send方法的目标地址。 使用方式如下: @Controller public class WebSocketController { @Autowired public SimpMessagingTemplate template; @MessageMapping("/hello") @SendTo("/topic/hello") public Greeting greeting(Greeting message) throws Exception { return message; } @MessageMapping("/message") @SendToUser("/message") public UserMessage userMessage(UserMessage userMessage) throws Exception { return userMessage; } } 第一个方法,表示服务端可以接收客户端通过向地址“/hello”发送过来的消息。@SendTo表示此方法会向订阅”/topic/hello”的用户广播message消息。@SendTo("/topic/hello")注解等同于使用SimpMessagingTemplate.convertAndSend("/topic/hello", new Response("你好" ));客户端通过stomp.subscribe("/topic/hello", handleFunction);方法订阅的地方都能收到消息。第二个方法道理相同,只是注意这里用的是@SendToUser,这就是发送给单一客户端的标志。本例中,客户端接收一对一消息的主题应该是“/user/message” ,”/user/”是固定的搭配,服务器会自动识别。@SendToUser("/message") 等同于使用SimpMessagingTemplate.convertAndSendToUser(Key,"/message", "新消息");客户端通过stomp.subscribe("/user/message", handleFunction);方法订阅的并且注册时返回的username=Key时才能收到消息。注意:相关的注解还有很多,此处不一一描述。四、点对点发送流程 一对多广播消息流程比较简单,此处不做描述。 点对点发送功能区别不仅仅在使用@SendToUser或者是convertAndSendToUser方法。最重要的区别,在于底层的实现逻辑上面。 当我在刚刚学习的时候遇到了一个问题,客户端通过 stomp.subscribe("/user/queue/notifications", handleFunction);订阅的地址,居然能收到后台使用 SimpMessagingTemplate.convertAndSendToUser(user.toString,"/queue/notifications", "新消息");发布的点对点消息。 通过研究代码,发现convertAndSendToUser底层通过方法: @Override public void convertAndSendToUser(String user, String destination, Object payload, Map headers, MessagePostProcessor postProcessor) throws MessagingException { Assert.notNull(user, "User must not be null"); user = StringUtils.replace(user, "/", "%2F"); super.convertAndSend(this.destinationPrefix + user + destination, payload, headers, postProcessor); }将"/queue/notifications"转换成了"/user/UserDO{userId=1,accountType=0, username='admin',name='超级管理员',...}/queue/notifications"。而前端按照网上的说法应该通过订阅相同的地址"/user/UserDO{userId=1,accountType=0, username='admin',name='超级管理员',...}/queue/notifications"才能够接受消息才对。通过前辈的指点,加上自己debug源码才发现其中的奥秘。系统启动通过stomp.subscribe("/user/queue/notifications", handleFunction);订阅的时候,会调用org.springframework.messaging.simp.user.DefaultUserDestinationResolver的resolveDestination方法,将连接服务器返回给前端的username传回给resolveDestination方法,然后获取此用户的sessionID,此ID是连接服务器时,为每个用户生成的唯一ID,通过返回给前端的username(我的系统此时username=UserDO{userId=1,accountType=0, username='admin',name='超级管理员',...},是用户user实体的toString()字符串)来获取。然后最后将"/user/queue/notifications"地址转换为"/queue/notifications-userefna60v1",其中”-user”是固定的搭配,”efna60v1”就是用户的sessionID。服务器通过方法SimpMessagingTemplate.convertAndSendToUser(user.toString(),"/queue/notifications", user.getName()+"新消息");发送消息时,首先的确是先将"/queue/notifications"转换为"/user/UserDO{userId=1,accountType=0, username='admin',name='超级管理员',...}/queue/notifications",但是紧接着也会通过调用resolveDestination方法将刚刚的地址转换为"/queue/notifications-userefna60v1",其中是通过将原地址字符串进行分解,得到”UserDO{userId=1,accountType=0, username='admin',name='超级管理员',...}”,然后再通过此信息获取到用户注册时生成的sessionID,最后向"/queue/notifications-userefna60v1"地址广播消息,因为订阅此地址的客户端只有一个,因此实现了点对点通信功能。此过程涉及到的其他方法如下:private ParseResult parse(Message message) { MessageHeaders headers = message.getHeaders(); String sourceDestination = SimpMessageHeaderAccessor.getDestination(headers); if (sourceDestination == null || !checkDestination(sourceDestination, this.prefix)) { return null; } SimpMessageType messageType = SimpMessageHeaderAccessor.getMessageType(headers); switch (messageType) { case SUBSCRIBE: case UNSUBSCRIBE: return parseSubscriptionMessage(message, sourceDestination); case MESSAGE: return parseMessage(headers, sourceDestination); default: return null; } }private ParseResult parseMessage(MessageHeaders headers, String sourceDestination) { int prefixEnd = this.prefix.length(); int userEnd = sourceDestination.indexOf('/', prefixEnd); Assert.isTrue(userEnd > 0, "Expected destination pattern \"/user/{userId}/**\""); String actualDestination = sourceDestination.substring(userEnd); String subscribeDestination = this.prefix.substring(0, prefixEnd - 1) + actualDestination; String userName = sourceDestination.substring(prefixEnd, userEnd); userName = StringUtils.replace(userName, "%2F", "/"); String sessionId = SimpMessageHeaderAccessor.getSessionId(headers); Set sessionIds; if (userName.equals(sessionId)) { userName = null; sessionIds = Collections.singleton(sessionId); } else { sessionIds = getSessionIdsByUser(userName, sessionId); } if (!this.keepLeadingSlash) { actualDestination = actualDestination.substring(1); } return new ParseResult(sourceDestination, actualDestination, subscribeDestination, sessionIds, userName); }//通过设置的userName来查询sessionIdprivate Set getSessionIdsByUser(String userName, String sessionId) { Set sessionIds; SimpUser user = this.userRegistry.getUser(userName); if (user != null) { if (user.getSession(sessionId) != null) { sessionIds = Collections.singleton(sessionId); } else { Set sessions = user.getSessions(); sessionIds = new HashSet(sessions.size()); for (SimpSession session : sessions) { sessionIds.add(session.getId()); } } } else { sessionIds = Collections.emptySet(); } return sessionIds; }五、Stomp客户端API 1、发起连接 client.connect(headers, connectCallback, errorCallback);其中headers表示客户端的认证信息:var headers = { login: 'mylogin', passcode: 'mypasscode', // additional header 'client-id': 'my-client-id' };若无需认证,直接使用空对象 “{}” 即可; connectCallback 表示连接成功时(服务器响应 CONNECTED 帧)的回调方法; errorCallback 表示连接失败时(服务器响应 ERROR 帧)的回调方法,非必须; 实例代码: // 建立连接对象(还未发起连接) var socket=new SockJS("/endpointChat"); // 获取 STOMP 子协议的客户端对象 var stompClient = Stomp.over(socket); // 向服务器发起websocket连接并发送CONNECT帧 stompClient.connect( {}, function connectCallback (frame) { // 连接成功时(服务器响应 CONNECTED 帧)的回调方法 console.log('已连接【' + frame + '】'); //订阅一个消息 stompClient.subscribe('/topic/getResponse',function (response) { showResponse(response.body);}); }, function errorCallBack (error) { // 连接失败时(服务器响应 ERROR 帧)的回调方法 console.log('连接失败【' + error + '】'); } );2、断开连接 若要从客户端主动断开连接,可调用 disconnect() 方法:client.disconnect(function () { alert("断开连接"); });3、发送信息 连接成功后,客户端可使用 send() 方法向服务器发送信息:client.send(destination url, headers, body);其中: (1)destination url 为服务器 controller中 @MessageMapping 中匹配的URL,字符串,必须参数; (2)headers 为发送信息的header,JavaScript 对象,可选参数; (3)body 为发送信息的 body,字符串,可选参数;实例代码:client.send("/queue/test", {priority: 9}, "Hello, STOMP"); client.send("/queue/test", {}, "Hello, STOMP");4、订阅、接收消息 STOMP 客户端要想接收来自服务器推送的消息,必须先订阅相应的URL,即发送一个 SUBSCRIBE 帧,然后才能不断接收来自服务器的推送消息。 订阅和接收消息通过 subscribe() 方法实现: subscribe(destination url, callback, headers) 其中 (1)destination url 为服务器 @SendTo 匹配的 URL,字符串; (2)callback 为每次收到服务器推送的消息时的回调方法,该方法包含参数 message; (3)headers 为附加的headers,JavaScript 对象;该方法返回一个包含了id属性的 JavaScript 对象,可作为 unsubscribe() 方法的参数;默认情况下,如果没有在headers额外添加,这个库会默认构建一个独一无二的ID。在传递headers这个参数时,可以使用你自己id。 参考代码: var headers = {ack: 'client',//这个客户端指定了它会确认接收的信息,只接收符合这个selector : location = 'Europe'的消息。 'selector': "location = 'Europe'",//id:’myid’}; var callback = function(message) {if (message.body) { alert("got message with body " +JSON.parse( message.body)) } else{alert("got empty message"); } }); var subscription = client.subscribe("/queue/test", callback, headers);如果想让客户端订阅多个目的地,你可以在接收所有信息的时候调用相同的回调函数:onmessage = function(message) { // called every time the client receives a message}var sub1 = client.subscribe("queue/test", onmessage);var sub2 = client.subscribe("queue/another", onmessage)5、取消订阅 var subscription = client.subscribe(...); subscription.unsubscribe();6、事务支持 可以在将消息的发送和确认接收放在一个事务中。 客户端调用自身的begin()方法就可以开始启动事务了,begin()有一个可选的参数transa ction,一个唯一的可标识事务的字符串。如果没有传递这个参数,那么库会自动构建一个。 这个方法会返回一个object。这个对象有一个id属性对应这个事务的ID,还有两个方法: commit()提交事务 abort()中止事务 在一个事务中,客户端可以在发送/接受消息时指定transaction id来设置transaction // start the transactionvar tx = client.begin();// send the message in a transactionclient.send("/queue/test", {transaction: tx.id}, "message in a transaction");// commit the transaction to effectively send the messagetx.commit();如果你在调用send()方法发送消息的时候忘记添加transction header,那么这不会称为事务的一部分,这个消息会直接发送,不会等到事务完成后才发送。var txid = "unique_transaction_identifier";// start the transactionvar tx = client.begin();// oops! send the message outside the transactionclient.send("/queue/test", {}, "I thought I was in a transaction!");tx.abort(); // Too late! the message has been sent7、消息确认ack 默认情况,在消息发送给客户端之前,服务端会自动确认(acknowledged)。 客户端可以选择通过订阅一个目的地时设置一个ack header为client或client-individual来处理消息确认。 在下面这个例子,客户端必须调用message.ack()来通知客户端它已经接收了消息。 var subscription = client.subscribe("/queue/test", function(message) { // do something with the message ... // and acknowledge it message.ack(); }, {ack: 'client'});ack()接受headers参数用来附加确认消息。例如,将消息作为事务(transaction)的一部分,当要求接收消息时其实代理(broker)已经将ACK STOMP frame处理了。var tx = client.begin();message.ack({ transaction: tx.id, receipt: 'my-receipt' });tx.commit();nack()也可以用来通知STOMP 1.1.brokers(代理):客户端不能消费这个消息。与ack()方法的参数相同。8、心跳机制 如果STOMP broker(代理)接收STOMP 1.1版本的帧,heart-beating是默认启用的。 heart-beating也就是频率,incoming是接收频率,outgoing是发送频率。 通过改变incoming和outgoing可以更改客户端的heart-beating(默认为10000ms) client.heartbeat.outgoing = 20000; // client will send heartbeats every 20000msclient.heartbeat.incoming = 0;// client does not want to receive heartbeats// from the serverheart-beating是利用window.setInterval()去规律地发送heart-beats或者检查服务端的heart-beats。 |
 3、连接时验证登录权限
【本文地址】